


Dispenser Positioning
Mounting the Dispenser Assembly is an important step and it’s also something many people get wrong. Take the time to ensure all components are secure and the nib is accurately positioned on the sprocket face.
Actually delivering oil to the chain is something so many people get wrong. The oil should always be fed to the inside of the chain where it can be centrifuged outwards. We always recommend delivering Scottoil onto the face of the sprocket, with the tip of the Injector nib LIGHTLY resting on the surface, being careful to avoid: the chain, any sprocket windows, the teeth and also the retaining nuts when spinning round. The slash cut at the end of the injector nib should face OUTWARDS to avoid being blocked by grit or friction from the sprocket.
Here you will learn about the proper way to set up your Scottoiler oil Dispenser and what options you have.
- Multiform dispenser information
- Single sided swingarm installation
- Alternative dispenser plates
- Correct dispenser positioning
- Tube routing tipps
- Joining pieces of tubing together
Below is the Multiform Dispenser Bracket and Metal Micro Dispenser Plate
Dry fit the Multiform Bracket to the swingarm first, this allows it to be shaped and trimmed (if necessary) along with proper alignment to the sprocket before permanent fitment.

Note: One side of the Multiform bracket has been trimmed to fit the shaped swingarm.
Scorpion Dual Injector fitted with Multiform Bracket

When installing the Multiform Bracket make sure you consult the instructions about correctly positioning the dispenser plate along with the chain adjustment on the swingarm, this will help keep the dispenser nib on the sprocket face when the chain is either adjusted or replaced.


Below are examples of different installation options for the Multiform Bracket


Single Sided Swingarm Installation


Below are examples of using the Metal Micro Dispenser Plate, utilising either Bobbin mounting holes or lower Chain Guards.


Below are the other Metal Dispensers that can be used for installation
The Micro Dispenser Plate is supplied with all kits, the other size Metal Dispensers shown below can be found here
 The Large Dispenser Plate is designed to be secured on the rear wheel spindle, as shown opposite.
 Hint: In some cases the wheel spindle should be reversed in order to position the lock nut on the same side as the chain and sprocket. This allows easier access to the Dispenser Plate if adjustment is required.
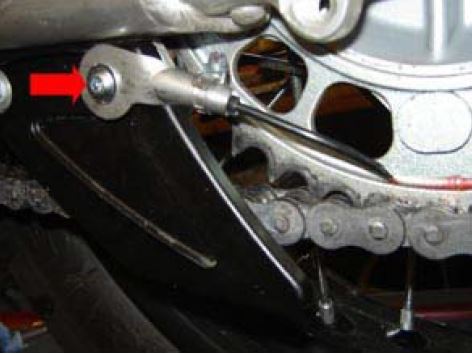
 The Small Dispenser Plate is used in the same way to secure the nib and is ideal for mounting on Paddock Stand bobbin bosses or chain / sprocket guard mounting bolts.
The picture opposite shows the small Dispenser Plate secured with a paddock stand bobbin. If you don’t use bobbins, simply use a bolt to secure the plate.
 The picture on the left shows how the Small Dispenser Plate can be secured using the bolts which hold the rear sprocket guard or shark-fin guard on many off-road and road bikes.
Chain Guard Mount Adapter (SA-0073)
 On certain models, where paddock stand bobbin mounts do not exist and the spindle is too large for the Dispenser Plate, it may be possible to mount the Small Dispenser Plate using a Chain Guard Mount Adapter (Code SA-0073).
Note: If mounting as high as this it is preferable to feed the sprocket face at around 9 o’clock on the sprocket face (or around 3 o’clock on a bike with the chain on the right hand side).
Dispenser Nib Position
Securing the Dispenser - Metal Micro Dispenser Plate
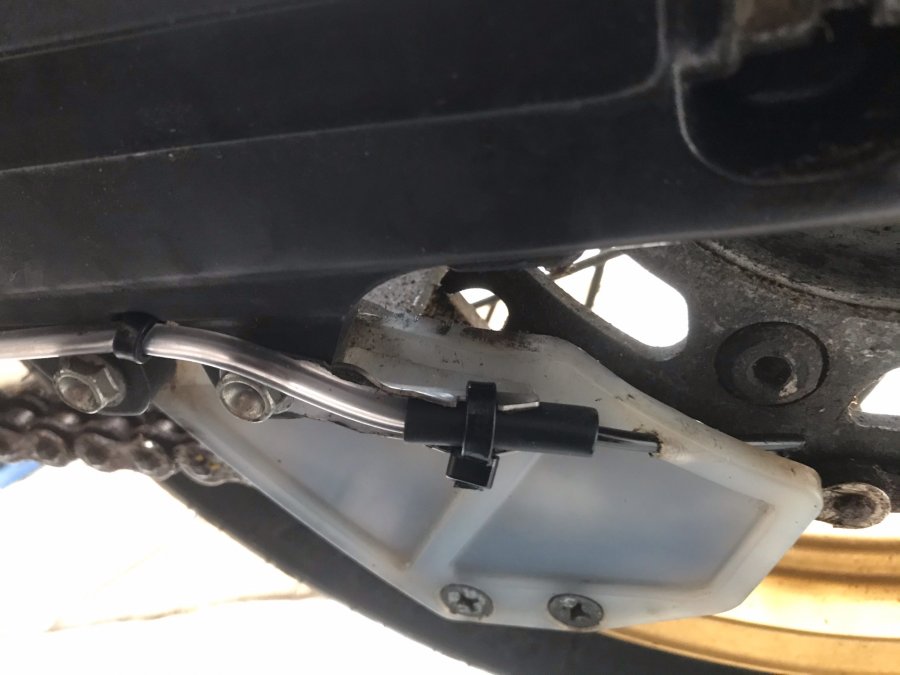
 Scottoiler recommend feeding oil onto the face of the rear sprocket. Take care to avoid sprocket bolts, lightening holes, the teeth and the chain itself. The nib should just lightly touch the sprocket face with the slash cut at the end facing outwards, as shown opposite, to avoid it being blocked by grit or friction.
Dripping oil onto the chain from above is not recommended. Wind pressure around the rear of the bike will pick up the droplets of oil and fire them in all directions, contaminating the running surface of the tyre, as well as creating a big mess!
Tube Routing
 Once you have chosen a location for the reservoir (REP/RMV), always start at the dispenser end and route the clear Delivery Tubing along the swing arm using the self adhesive tube clips provided. Ensure the surface of the swing arm is completely free of grease before applying them. Choose the neatest path until you reach the reservoir.
Take care to avoid moving components such as the chain, and ensure you leave enough slack for the full range of swing arm movement. Also avoid hot engine and exhaust components which could potentially damage the tubing.
Discreet Tube Routing

If you have a black swingarm and want a more discreet installation, it is possible to use a section of Scottoiler black nylon Vacuum Tubing along the length of the swingarm.
Note: We do not recommend using longer lengths of this thinner tubing as it can make priming very difficult. It should only be used along the length of the swing arm where it can then be pushed into the clear delivery tubing at the swing arm pivot area as described in “Joining Pieces” below.
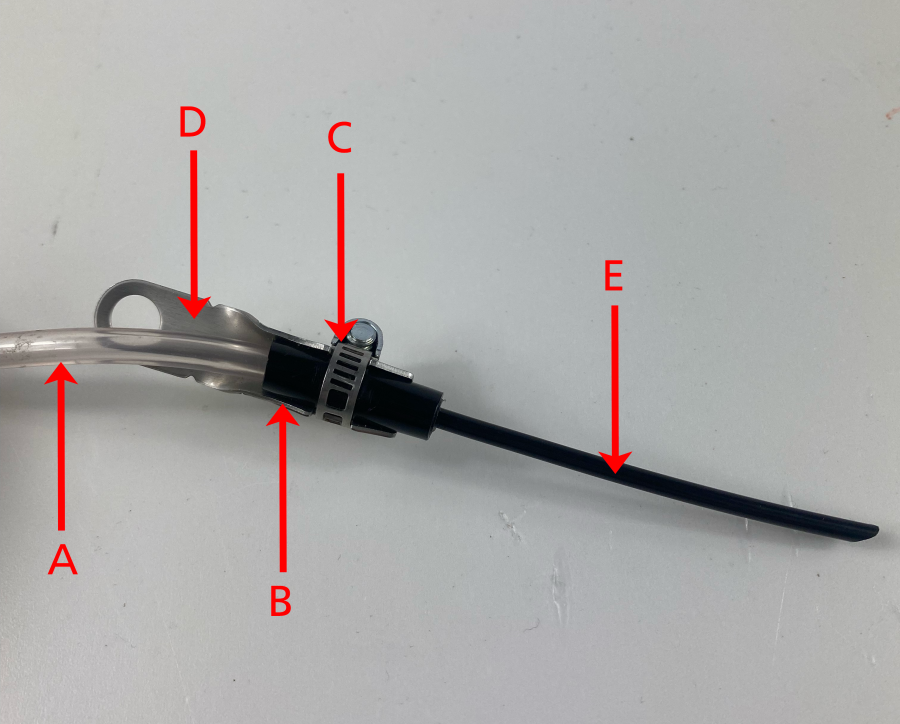
Hint: When making a dispenser from Vacuum tubing (A), it is necessary to shim it using short sections of both clear delivery tubing (B) and Dispenser sleeve (C) which will make it a perfect fit in the dispenser plate and clip.
Joining Pieces
 If necessary, damaged tubing can be re-joined or extended using a joining piece made from Scottoiler vacuum tubing.
Heat the end of the black nylon tubing by twisting it over the flame of a lighter or match until you see the end “mushroom”. This only takes 1 – 2 seconds.
 Let the mushroomed end cool and then push it into the end of the Delivery Tubing for an air-tight seal.
 If making a joining piece, repeat the above steps to mushroom the other end of the black nylon tube and connect the new section of delivery tubing.
Replacement Nibs
 It is possible to make replacement nibs using left over vacuum tubing, remember to slash cut the nib and mushroom the opposite end as described above for a secure, air-tight seal. If you need new Dispenser Nibs they can be purchased Here
Hint: If you are repeatedly losing nibs review the nib position and rotate the rear wheel slowly by hand, ensuring the sprocket bolts, teeth, lightening holes and the chain do not foul the nib.
